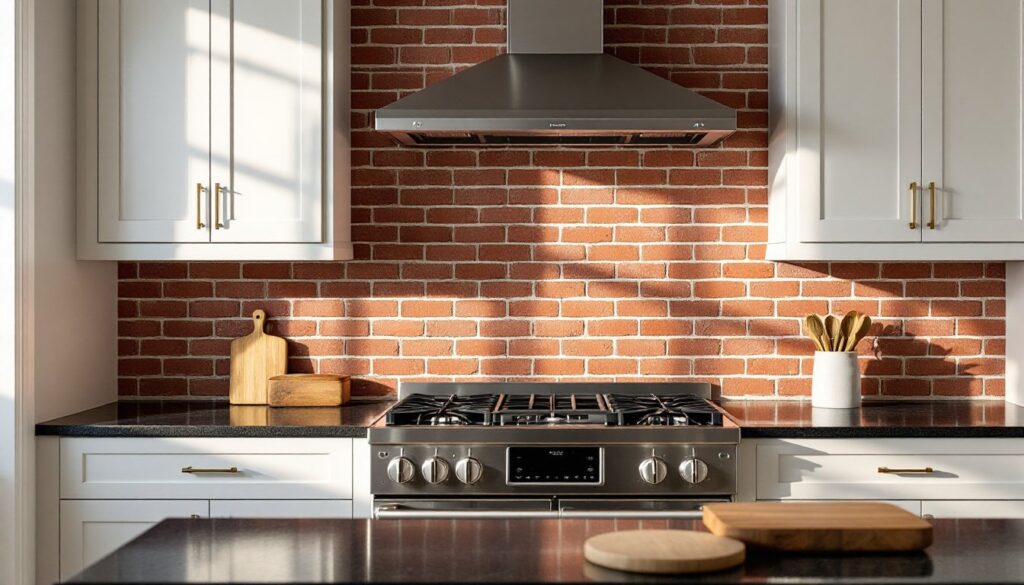
A brick backsplash brings raw, tactile character to a kitchen in a way few other materials can. Whether it’s the warm red tones of exposed brick or the crisp, clean look of a white brick kitchen backsplash, this design element bridges rustic and modern aesthetics with surprising flexibility. For DIYers and homeowners looking to add dimension and durability without blowing the budget, installing a kitchen brick backsplash is a manageable weekend project that delivers outsized visual impact. With options ranging from authentic thin brick to lightweight faux panels, there’s a version that fits nearly any skill level and timeline.
Table of Contents
ToggleKey Takeaways
- A brick backsplash kitchen brings durable, heat-resistant character that bridges rustic and modern design, making it a smart choice for homeowners seeking visual impact without complexity.
- Real thin brick veneer costs $6–$12 per square foot while faux panels run $3–$8 per square foot, with a typical 30-square-foot installation totaling $200–$500 in materials.
- Installing a brick backsplash is a manageable DIY project that follows standard tile installation steps—thinset application, brick placement, grouting, and sealing—requiring only basic tools like a wet saw and notched trowel.
- Proper sealing with a penetrating siloxane product is essential to protect brick and grout from grease, moisture, and stains, with reapplication recommended every 1–2 years in high-use kitchens.
- Design versatility allows white brick backsplashes for modern farmhouse styles, red brick for industrial kitchens, or whitewashed finishes for a softer aesthetic, paired with complementary cabinetry and countertops.
- Low-maintenance care involves weekly damp-cloth cleaning with mild soap, avoiding acidic cleaners, and addressing grease buildup with baking soda paste, ensuring a brick backsplash looks fresh for decades.
Why Choose a Brick Backsplash for Your Kitchen?
Brick offers a unique combination of durability, heat resistance, and design versatility that makes it well-suited to kitchen environments. Unlike painted drywall or even some tile options, brick backsplashes can handle the daily wear of splashes, steam, and minor impacts without showing damage quickly.
From a design standpoint, brick brings texture and depth. Flat surfaces dominate most kitchens, smooth cabinetry, polished countertops, stainless appliances. A brick backsplash for kitchen installations introduces visual relief and breaks up the monotony. The three-dimensional mortar lines and varied surface of each brick catch light differently throughout the day, creating subtle shifts in appearance.
Installation is straightforward compared to complex tile patterns or natural stone. Most thin brick products install with standard tile adhesive (thinset) and don’t require specialized cutting tools beyond a wet saw or angle grinder. This accessibility makes it a realistic DIY project for intermediate skill levels.
Cost varies widely depending on material choice. Real thin brick veneer typically runs $6–$12 per square foot for materials alone, while faux brick panels can be found for $3–$8 per square foot. Factor in thinset, grout, and sealer, and a typical backsplash covering 30 square feet might land between $200 and $500 in materials, competitive with mid-range ceramic tile.
Types of Brick Backsplashes to Consider
Choosing between real and faux brick comes down to budget, desired authenticity, and installation constraints. Both have legitimate applications.
Real Brick Veneer
Thin brick veneer is actual clay brick sliced to roughly ½ to ¾ inch thickness. It’s fired in a kiln just like full bricks, so the color and texture are genuine. Typical dimensions are about 7½ × 2¼ inches, matching standard modular brick proportions.
This material installs much like tile: apply thinset mortar to a clean, sound wall surface (cement board over drywall is ideal for wet areas near the sink), press the bricks in place with consistent spacing, and grout the joints. Use Type S mortar or a polymer-modified sanded grout for the joints, typically ⅜ to ½ inch wide.
Pros: Authentic look and feel, excellent heat resistance (perfect behind ranges), long lifespan, and real color variation from brick to brick.
Cons: Heavier than alternatives, requires cutting with a wet saw for outlets and edges, and installation takes more time due to individual piece placement.
A whitewashed brick backsplash kitchen look can be achieved by applying a thinned white latex paint or lime wash over installed brick veneer, allowing the texture to show through while lightening the overall tone.
Faux Brick Panels and Tiles
Faux brick panels are typically made from high-density polyurethane, PVC, or MDF with a molded brick texture and factory finish. Panels often come in 4 × 8-foot sheets or smaller interlocking sections, dramatically speeding up installation.
Installation usually involves construction adhesive (like Loctite PL Premium or Liquid Nails Heavy Duty) applied to the back of the panel, then pressing it to the wall. Some systems use clips or trim pieces to hide seams. No grout is required, joints are part of the molded design.
Pros: Lightweight, fast installation (a full backsplash can go up in a few hours), no special tools needed, and consistent appearance across panels.
Cons: Less heat resistant (check manufacturer specs, most advise keeping faux brick at least 6 inches from open flame or intense heat sources), can look obviously fake up close depending on quality, and limited customization for grout color or brick layout.
For renters or commitment-phobes, peel-and-stick brick tile products exist, though these are best for low-moisture, decorative applications rather than directly behind a sink.
Step-by-Step Guide to Installing a Brick Backsplash
This walkthrough covers thin brick veneer installation, the most common DIY-friendly real brick method. Adjust as needed for faux panels.
Materials and Tools:
- Thin brick veneer (calculate square footage and add 10% for cuts and waste)
- Cement backer board (¼ inch, if not already present)
- Thinset mortar (polymer-modified)
- Sanded grout (Type S mortar or matching grout)
- Brick sealer (penetrating siloxane or silane type)
- Wet saw with diamond blade or angle grinder
- Notched trowel (¼ × ¼ inch square notch)
- Grout float and sponge
- Level, tape measure, pencil
- Safety glasses, dust mask, work gloves
Step 1: Prep the Wall
Remove any existing backsplash material down to bare drywall. If the wall is painted drywall, installing ½-inch cement backer board is highly recommended, especially near the sink. Screw backer board to studs with 1¼-inch cement board screws every 8 inches. Tape and thinset the seams. Let cure at least 24 hours.
Turn off power to any outlets in the work area at the breaker. Remove outlet covers.
Step 2: Plan Your Layout
Dry-lay a row of bricks on the counter to determine spacing and cuts. Standard mortar joints are ⅜ to ½ inch. Use plastic tile spacers for consistency. Mark your starting point, typically centered on a focal feature like the range or sink.
If the backsplash height ends mid-brick, plan to cut bricks lengthwise at the top row rather than the bottom, where the counter hides any slight irregularities.
Step 3: Mix and Apply Thinset
Mix thinset mortar to a peanut butter consistency per bag instructions. Let it slake (rest) for 10 minutes, then remix. Working in roughly 3-square-foot sections, spread thinset with the flat side of your trowel, then comb it with the notched side at a 45-degree angle to create ridges.
Step 4: Set the Bricks
Press each brick firmly into the thinset with a slight twisting motion. Insert spacers between bricks to maintain joint width. Check level frequently, every few bricks horizontally and after each row vertically. Thin brick is unforgiving: once thinset begins to set (usually 20–30 minutes), repositioning gets difficult.
For cuts around outlets or edges, mark the brick, then score and cut with a wet saw. Wear safety glasses and a dust mask, brick dust is silica-based and hazardous when inhaled.
Step 5: Grout the Joints
Wait at least 24 hours for thinset to cure. Mix sanded grout and apply with a grout float held at a 45-degree angle, pressing grout deep into joints. Work diagonally across the bricks to avoid pulling grout out of joints.
After 15–20 minutes (when grout is firm but not hard), wipe the surface with a damp sponge in circular motions, rinsing frequently. Avoid overwetting, this weakens grout. Let cure per manufacturer instructions (usually 48–72 hours).
Step 6: Seal the Brick
Apply a penetrating brick sealer to protect against staining and moisture. This is especially important for a white brick backsplash kitchen, where grease and splatter show easily. Use a brush or roller, following product directions. Most sealers require reapplication every 1–2 years in high-use kitchens.
Design Ideas and Color Combinations That Work
Brick’s natural warmth pairs well with a range of kitchen styles, but intentional color and material pairings elevate the result.
White brick kitchen backsplash installations work beautifully in modern farmhouse or Scandinavian-inspired kitchens. Pair with light wood cabinetry (maple or white oak), matte black hardware, and marble or quartz countertops in soft gray or white. The brick adds texture without competing for attention.
For those drawn to minimalist brick tile designs, consider running bond (standard offset pattern) in a monochromatic palette. This approach highlights the material’s inherent geometry without additional visual complexity.
Red or natural clay brick backsplashes bring warmth to industrial or traditional kitchens. Balance the strong color with neutral surroundings: white subway tile on adjacent walls, stainless steel appliances, and dark countertops like soapstone or black granite. Avoid pairing red brick with warm wood tones throughout, the result can feel muddy. Instead, mix in cool metals (brushed nickel, matte black) and crisp whites.
Whitewashed or limewashed brick offers a middle ground. The technique softens the brick’s color while preserving texture. To achieve this, mix white latex paint with water (roughly 1:1 ratio) and brush onto installed brick, wiping back immediately with a rag to let the base color show through. Alternatively, use a lime wash product for a more authentic, breathable finish. Many designers are showcasing creative brick backsplash layouts that combine whitewashing with herringbone or vertical stack bond patterns.
For grout color, match the brick for a seamless look, or go slightly darker for definition. With white brick, a light gray grout (instead of pure white) hides minor staining better over time.
Layout patterns make a difference. Running bond (each brick offset by half) is classic and forgiving for DIYers. Herringbone adds visual interest but requires more cuts and careful planning, best for experienced installers. Vertical stack bond (bricks aligned vertically and horizontally) creates a modern, grid-like look but shows any imperfections in alignment.
Maintenance and Care Tips for Brick Backsplashes
Brick backsplashes are low-maintenance, but they’re porous and require some care to stay looking sharp.
Sealing is non-negotiable. Unsealed brick and grout absorb grease, moisture, and stains. Reapply penetrating sealer annually in high-use areas, every two years elsewhere. Water should bead up on a properly sealed surface. If it soaks in, it’s time to reseal.
Daily cleaning: Wipe down with a damp microfiber cloth or sponge and mild dish soap. Avoid acidic cleaners (vinegar, citrus-based products) on unsealed or natural brick, they can etch the surface and degrade grout.
Grease buildup: For tougher grease spots, use a degreasing dish soap or a paste of baking soda and water. Apply, let sit for 5–10 minutes, scrub gently with a soft brush, and rinse. Don’t use abrasive pads on brick: they can scratch softer clay surfaces.
Grout maintenance: Grout lines can darken over time, especially near the range. A grout pen or diluted bleach solution (1 part bleach to 10 parts water, applied with a small brush) can refresh dingy grout. Rinse thoroughly afterward.
Avoid steam cleaners directly on brick. The high heat and moisture can penetrate deep into the material, potentially causing efflorescence (white salt deposits) or loosening adhesive over time.
For faux brick panels, maintenance is simpler, wipe with all-purpose cleaner and avoid harsh solvents that might damage the finish or adhesive bond.
Damage repair: If a brick chips or cracks, it’s possible to remove and replace individual pieces. Score the grout around the damaged brick with a grout saw, carefully chisel out the brick, clean the substrate, and set a new brick with fresh thinset and grout. This is easier with real brick than with molded faux panels, where matching the finish can be tricky.
Regular care keeps a brick kitchen backsplash looking fresh for decades. The material ages gracefully, minor patina and color shifts are part of its charm, not flaws to fix.