A bathroom vanity isn’t just a functional piece, it’s the anchor of the room. When a homeowner chooses a wooden bathroom vanity, they’re investing in durability, warmth, and a design element that can outlast trend cycles. Wood brings natural texture and grain patterns that synthetic materials can’t replicate, and it adapts to nearly any design direction, from clean-lined modern to reclaimed rustic. Whether someone’s replacing a builder-grade cabinet or building a full remodel from scratch, a bathroom vanity wood option offers real versatility. This guide walks through wood selection, style considerations, installation practicalities, and long-term care, everything needed to pick and install a wood vanity that performs as well as it looks.
Table of Contents
ToggleKey Takeaways
- A wood vanity bathroom combines durability, repairability, and timeless design—solid wood and quality plywood resists warping and moisture better than particle board or MDF when properly finished and ventilated.
- Hardwoods like oak, maple, and walnut are ideal for high-moisture bathrooms due to their Janka hardness rating above 1,000, while budget-friendly softwoods like pine require meticulous sealing and work best in well-ventilated powder rooms.
- Style alignment matters: modern designs favor clean-lined walnut or white oak, rustic styles showcase reclaimed or distressed wood, and traditional vanities use cherry or mahogany with decorative molding—matching your home’s architecture prevents a disjointed look.
- Proper installation requires locating studs for secure anchoring, leveling and shimming the vanity, caulking seams to prevent water intrusion, and testing all plumbing connections before finishing to protect against cabinet damage.
- Long-term wood vanity bathroom maintenance hinges on running exhaust fans for 15+ minutes post-shower, wiping water immediately, inspecting caulk every six months, and reapplying finish periodically—catching moisture issues early prevents costly rot and mold.
- A well-maintained wood vanity develops natural patina and character over decades, increases home resale value by signaling quality cabinetry investment, and far outlasts synthetic alternatives when given proper care.
Why Choose a Wood Vanity for Your Bathroom
Wood vanities hold up where particle board and MDF-wrapped options fail. Solid wood and quality plywood construction handle moisture better than many people expect, provided the finish is intact and ventilation is adequate. Hardwood face frames resist warping, and dovetailed drawers won’t sag after a few years of towel storage.
From a design standpoint, wood grain adds dimension that flat-finish cabinets lack. Stain highlights the natural figure: paint can be refreshed without replacing the entire unit. A wooden vanity bathroom setup pairs well with tile, stone, and metal fixtures, it’s a neutral that works across palettes.
Resale value matters, too. Buyers notice quality cabinetry. A well-maintained wood vanity signals that a homeowner invested in the bones of the space, not just cosmetic updates. It’s one of those details that doesn’t scream for attention but gets noticed during walkthroughs.
One practical advantage: repairability. Dents and scratches in solid wood can be sanded and refinished. Laminate or thermofoil damage usually means replacement. For a high-traffic family bathroom, that longevity offsets the higher upfront cost.
Popular Wood Types for Bathroom Vanities
Not all wood species perform the same in a humid environment. Hardwoods like oak, maple, and walnut are common choices for bathroom cabinetry. Oak offers open grain and takes stain predictably: maple is tight-grained and ideal for painted finishes: walnut delivers rich, dark tones without stain. Each has a Janka hardness rating above 1,000, which translates to good dent resistance.
Teak and bamboo show up in modern and eco-conscious designs. Teak is naturally oily and resists moisture intrinsically, it’s the same wood used on boat decks. Bamboo is technically a grass, but engineered bamboo plywood is stable and sustainable. Both cost more per board foot than domestic hardwoods.
Softwoods like pine and cedar are budget-friendly but require sealed finishes and aren’t ideal for high-moisture baths without proper exhaust. Pine dents easily: cedar’s aromatic oils can bleed through some finishes. They work fine in powder rooms with good ventilation, less so in a shared family bath with a shower.
Hardwoods vs. Engineered Wood Options
Solid hardwood is traditional: face frames, door panels, and drawer fronts milled from lumber. It’s repairable and can be refinished multiple times. Expect to pay a premium, especially for domestic hardwoods sourced from sustainable mills.
Plywood with hardwood veneer is engineered but still a quality choice. Cabinet-grade plywood (usually Baltic birch or multi-ply maple) is dimensionally stable and resists warping better than solid wood panels in some cases. Veneer faces can be oak, walnut, or cherry. The core won’t move with humidity swings the way solid panels might.
MDF and particleboard are lower-tier options. MDF (medium-density fiberboard) takes paint well and is inexpensive, but it swells irreversibly if water penetrates the finish. Particleboard is even less moisture-tolerant. Both are common in budget vanities, but they’re not true wood and won’t hold up to a long-term bathroom environment without meticulous sealing. If someone’s shopping for a wood bathroom vanity with sink on a tight budget, a plywood cabinet with solid wood doors is a better compromise than an all-MDF unit.
Choosing the Right Wood Vanity Style
Style alignment matters as much as material. A vanity that clashes with the room’s architecture and finishes will look like an afterthought, no matter how well it’s built.
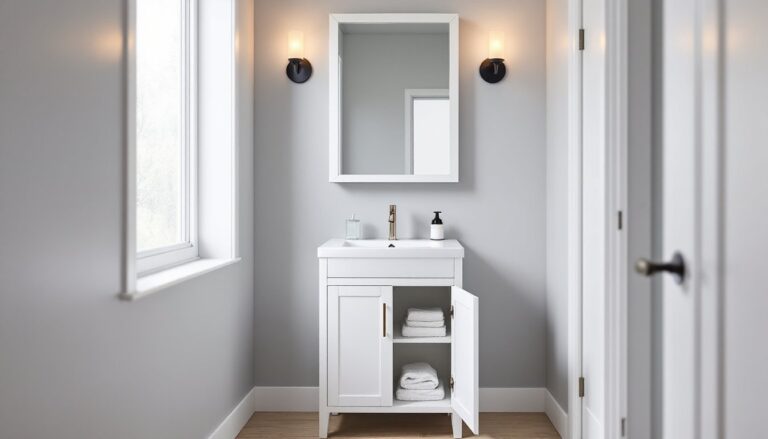
Modern vanities favor clean lines, flat-panel (slab) doors, and minimal hardware. Walnut, maple, or white oak with a matte or satin finish fit here. Floating (wall-mounted) vanities are popular in contemporary baths, they open up floor space and simplify cleaning. Expect to anchor into studs with a cleat or French cleat system: drywall anchors won’t support the weight of a filled cabinet and countertop. Some modern designs incorporate open shelving below the countertop, which works if towel storage is handled elsewhere.
Rustic and farmhouse styles lean into reclaimed wood, distressed finishes, and visible hardware. Knotty pine, reclaimed barn wood, and rough-sawn oak are typical. Many rustic vanities are DIY-friendly, converting an old dresser or building a simple frame-and-panel cabinet is approachable for intermediate woodworkers. Just ensure any reclaimed lumber is kiln-dried and treated: untreated barn wood can harbor insects or mold spores. Adding a wooden bathroom vanity with sink in a farmhouse style often means pairing it with an apron-front or vessel sink and oil-rubbed bronze fixtures.
Modern, Rustic, and Traditional Designs
Traditional vanities feature raised-panel doors, decorative molding, and furniture-style feet or legs. Cherry, mahogany, and oak are go-to species. These vanities often come as freestanding units that mimic antique furniture. They suit older homes with crown molding and wainscoting. Hardware matters: brushed nickel or aged brass knobs and pulls reinforce the period look.
When selecting between styles, consider the room’s architecture. A modern slab-door vanity in a 1920s bungalow with subway tile and hexagon floors will feel out of place unless the whole room is updated. Conversely, a heavy traditional vanity in a minimalist new-build bath will look dated. Examples of well-executed wood vanity bathroom designs often show style cohesion across fixtures, tile, and cabinetry.
Budget also plays a role. Custom furniture-style vanities run $1,500–$5,000 depending on size and wood species. Stock cabinets from big-box stores range $300–$1,200. Semi-custom lines from kitchen and bath showrooms fall in between, offering more finish and hardware options than stock but without the lead time of full custom work.
Installation Tips for Wood Bathroom Vanities
Installing a wood vanity isn’t complicated, but it does require attention to level, plumb, and secure anchoring. Most DIYers can handle a freestanding vanity installation: floating vanities and units over 48 inches wide may benefit from a helper.
Prep work starts with plumbing. Shut off the water supply, disconnect the old vanity’s plumbing, and remove the old unit. Check the wall for level and the floor for high spots. If the floor isn’t level, shim the vanity, don’t force it flat, or doors and drawers will bind. Use composite shims (they won’t compress like wood) and trim flush after securing.
Locating studs is critical, especially for wall-mounted vanities. Use a stud finder or probe with a finish nail in an inconspicuous spot. Standard stud spacing is 16 inches on center, but older homes and commercial buildings may vary. For a floating vanity, install a ledger board (a 1×4 or 2×4) screwed into at least two studs to support the cabinet weight. Lag screws or GRK-style structural screws work well here, standard drywall screws won’t cut it.
Most freestanding vanities attach to the wall with a cleat or through the cabinet back into studs. Drill pilot holes to avoid splitting hardwood backs. If the vanity doesn’t align with studs, use toggle bolts rated for the cabinet’s loaded weight (typically 50–100 lbs for a small vanity, more for larger units).
Plumbing hookup is straightforward if the new vanity’s sink placement matches the old drain and supply locations. If not, the P-trap may need adjustment or replacement. Use a basin wrench for tight spaces under the sink. Apply plumber’s putty or silicone (check sink manufacturer specs) around the drain flange before installing. Run a bead of silicone caulk along the vanity’s back edge where it meets the wall, this prevents water from seeping behind the cabinet. Don’t caulk the bottom edge to the floor: any leaks need an exit path, not a trapped moisture pocket.
For a wood bathroom vanity with sink that comes as a combo unit (integrated countertop and sink), installation is simpler, just level, secure, and connect plumbing. Separate countertop installations (stone, quartz, or butcher-block) require careful measurement and may need professional fabrication, especially for undermount sinks.
Always test for leaks before finishing. Turn the water on, fill the sink, and let it drain while checking all connections with a flashlight. Wipe joints with a paper towel to catch slow drips. A small leak left unchecked will damage a wood cabinet over time.
Permit requirements vary. Most jurisdictions don’t require a permit for a like-for-like vanity swap, but if the project involves moving plumbing or electrical (for instance, relocating a GFCI outlet), check local codes. Homeowners planning extensive renovations can explore project planning resources to clarify scope and budget before starting work.
Maintaining and Protecting Your Wood Vanity
Wood vanities last decades with minimal maintenance, but they aren’t maintenance-free. The key is protecting the finish and managing moisture.
Ventilation is non-negotiable. Run the exhaust fan during and after showers, aim for at least 15 minutes post-shower. Without adequate ventilation, even sealed wood will eventually show signs of moisture damage: raised grain, finish clouding, or mildew. If the bathroom doesn’t have a fan, installing one should be a priority. The Home Ventilating Institute recommends a fan rated for at least 1 CFM per square foot of bathroom space, and the unit should vent to the exterior, not into an attic.
Wipe up water immediately. Pools of water around the faucet or sink edge can seep into seams and under the countertop. Keep a small towel nearby and make it a habit, especially in a family bath where kids might splash. Standing water is the enemy of wood cabinetry.
Finish maintenance depends on the type. Polyurethane and conversion varnish finishes (common on factory cabinets) are durable and need little care beyond cleaning. Wipe with a damp cloth and mild dish soap: avoid ammonia-based cleaners, which can dull the finish. Oil finishes (tung oil, Danish oil) on natural or lightly stained wood need periodic reapplication, once or twice a year, depending on use. Wipe on a thin coat, let it soak, and buff off the excess.
Inspect caulk lines every six months. The bead along the wall and countertop can crack or shrink. Peel out old caulk, clean the joint with rubbing alcohol, and reapply. Use 100% silicone or a siliconized acrylic rated for kitchen and bath use. Latex caulk alone will fail in a damp environment.
For deeper cleaning or restoration, lightly sand with 220-grit sandpaper (always with the grain) and reapply finish. This works on solid wood and veneer if done carefully, veneer is thin, so don’t sand through it. If a door or drawer front is damaged beyond repair, many cabinet manufacturers sell replacement parts, or a local cabinet shop can mill a match.
Hardware should be checked and tightened periodically. Drawer slides can loosen: hinges may need adjustment. European-style hinges (common on modern cabinets) have built-in adjustments for up/down, in/out, and side-to-side alignment, useful if a door starts to sag or rub.
Finally, keep an eye on the area around the sink and faucet. If water is pooling or the caulk is discolored, address it immediately. Wood damage is progressive, catching it early means a simple re-caulk: ignoring it leads to rot, mold, and cabinet replacement. For broader renovation maintenance tips, design and remodel guides offer seasonal checklists and troubleshooting advice.
A wooden bathroom vanity that’s well-maintained will develop character over time, natural patina, subtle color shifts, without compromising structure or function. That’s the advantage of real wood: it ages instead of deteriorating.